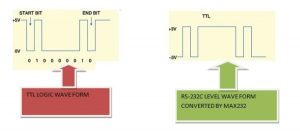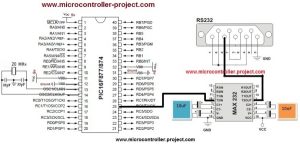

First of all to enable the serial port or TX(Transmission) RX(Reception) line. The SPEN(Serial port enable bit) bit of register RCSTA(Receive status and control register) should be high.
Set the Transmission setting in TXSTA(Transmit Status and Control Register) register.
I loaded 0x06 in TXSTA. 0x06 is hexadecimal value its equivalent binary is 00000110.
Set the Baud Rate in SPBRG Register. Their are two formulas for Baud Rates Calculation. Depending on the BRGH bit of TXSTA Register. Formula for BRGH=1 is Different for BRGH=0. Since this bit BRGH selects High or Low Baud Rates thats why Baud Rate depends on this bit.
I loaded 0x81 hexadecimal in it. Its equivalent binary is 10000001 and decimal value is 129. Since mine BRGH bit is high so by using the formula for BRGH=1 the Baud Rate value for 9600 is 129. Loading the value 129 in SPBRG and keeping BRGH=1 sets our Baud Rate to 9600.
The Data Which you want to transmit should be placed in TXREG(Transmit register) register. This register gives data to TSR Register. TSR then transmits the data serialy. TSR Register is not available for user you can not access it.
I write code in MP-Lab using High Tech C Compiler. The code is written in c language. First import the library htc.h. Always import this library in each project if you are writting code using high tech c compiler. Then Crystal frequency in defined. which is 20 MHz. In the main function first TRISC6=0 statement makes the Port-C bit 6 as output
pin. This pin is actually Multiplexed pin. It can be used as Digital I/O as well as TX line. So first make it as output pin. Then a string Array is defined. This Array contains my website name “www.microcontroller-project.com”. This String is displayed on Hyperterminal screen when the program runs. Then the registers are initialized i explaned their initialization above.
While 1 loop is continuously printing my website name on hyperterminal. While(TRMT=0) statement checks if the TSR Register is empty. If TSR is full The control remains on while(TRMT=0) statement and when TSR becomes empty. TRMT becomes 1 and control jumps to next statement.
Before running the program. Just set the hperterminal.Goto Start->Programs->Accessories->Communications>HyperTerminal open new connection, name it what ever you want then click ok. Now a window appears select COM1 from connect using drop down menu click ok. Now set COM1 properties, bits per second as you specified in your program in mine case 9600, Data bits=8, Parity=none, Stop bits=1, Flow control=none then click ok. Now switch on the power of your circuit, you will see “www.microcontroller-project.com” on Hyperterminal screen.
#include<htc.h>
#define _XTAL_FREQ 20e6
void main(){
TRISC6 = 0;
char Str[]=”https://ift.tt/2WTSN9o;;
unsigned int i=0;
RCSTA=0x80; //Configuring Tx and Rx pins
SPBRG=0x81; //Setting baud rate 9600
TXSTA=0x06; //Transmission settings
TXEN=1; //Transmit enabled (TXEN is TXSTA Bit)
while(1){
while(Str[i]!=’\0′){
while(TRMT==0); //Poll if TSR is Full TRMT (TXIF)
TXREG=Str[i];
__delay_ms(10);
i++;
}
TXREG=13; //13 is Command for Enter key. It will jump to next line of HyperTerminal window.
__delay_ms(1000);
i=0;
}
}
Download the project files with code and simulation. Code is written in c language and simulation is made in proteaus. Please Give us your feed back on the project.
Source: Serial Data Transfer to PC(Personal Computer) using PIC16f877 Microcontroller USART
The post Serial Data Transfer to PC(Personal Computer) using PIC16f877 Microcontroller USART appeared first on PIC Microcontroller.
from Blog – PIC Microcontroller https://ift.tt/2AROfYF


No comments:
Post a Comment
Please do not enter any spam link in the comment box.