Declutter your desk by sharing your mouse and keyboard across multiple computers at once, including your Raspberry Pis, with Barrier. Raspberry Pi Director of Software Engineering, Gordon Hollingworth, shows you how.
Barrier walkthrough
Subscribe to our YouTube channel: http://rpf.io/ytsub Help us reach a wider audience by translating our video content: http://rpf.io/yttranslate Buy a Raspbe…
Desk clutter is a given
My desk is a bit untidy. Talking to people in our office, you’ll find that it’s mostly because I only clear it properly once a year, or leave it entirely until the next time we move office!
It’s cluttered with Raspberry Pis of random types, with little tags saying what’s wrong or right about each one, and then there’s every manner of SD card, adapter, JTAG connector, headphones, and whiteboard marker pens you can dream of filling the gaps.
But one thing that really annoys me is that I tend to have a mouse and keyboard per computer, and I’ve got at least four computers running at my desk at any one time.
Solutions to this problem have existed for a very long time, known as KVM (keyboard, video and mouse) switches; many people use these to switch (literally with a big toggle switch) between computer 1, 2, and 3 while using a single screen.
But if that’s what you want to do, the best solution is to use VNC on each of the computers so you can use a single display, keyboard, and mouse to access each of their screens and bring them all together.
And, that’s okay, but…
But that’s not quite what I want: I like having the mass-screen real-estate around me, and I like just glancing to the left to see my Raspberry Pi on its own screen.
If only there was a way to share my mouse and keyboard across multiple computers without having to flick switches or unplug USBs.
Well…
Barrier to the rescue!
In the same way one may set up multiple monitors for one computer, and move the mouse cursor seamlessly between them, Barrier allows you to share peripherals between multiple computers, allowing you to host your keyboard and mouse on one computer. It lets you simply drag your cursor from screen to screen, from device to device, as if by magic.
Download and set up Barrier
Barrier is free to use, and simple to set up. You can either follow the video tutorial shared above, or continue reading below:
Download barrier to your main computer
First, download and install Barrier from the developers’ installation page: github.com/debauchee/barrier/releases
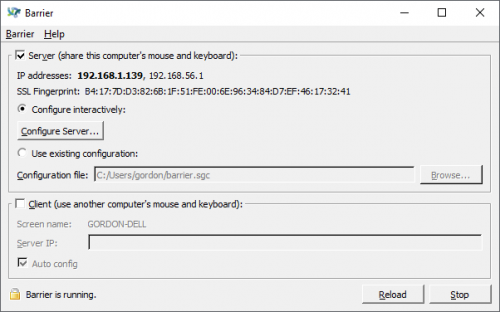
At the end of the installation, the application will run. Select the Server option (the server is the one that has the keyboard and mouse that you want to share).

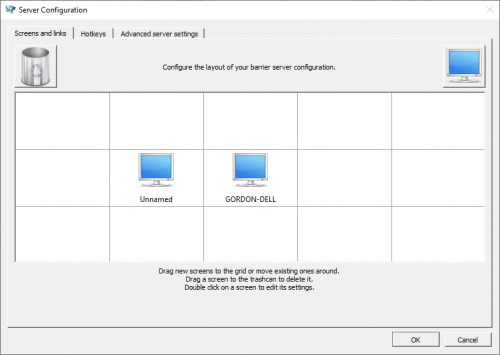
Next select Configure Server. Click on the computer screen in the top-right and drag it to where you want it to appear in relation to the server. It will default to being called ‘Unnamed’.

Next, double-click the new ‘Unnamed’ screen to set it up.

The only thing you need to do here is to set the screen name. Here I’ve changed it to ‘raspberrypi’. Click OK here and on the Server configuration‘ dialogue. You’ll return to the main Barrier page. Click Reload.
Download Barrier to your Raspberry Pi computer
Now turn to your Raspberry Pi, open a terminal window (Ctrl-Alt-T if you didn’t know), and run:
sudo apt install barrier
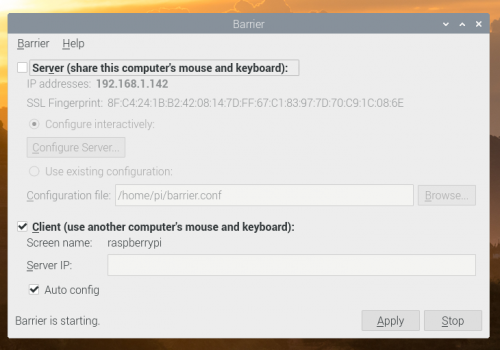
Once installation is complete, Barrier should appear in the Accessories drop-down menu, which you can access via the main menu icon (the Raspberry Pi logo in the top right-hand corner). Select Barrier and, this time, choose Client.

If you leave Auto config selected, Barrier should just work, as long as the screen name is correct (you can change this by clicking Barrier and then Change settings) and matches the name you told the server.
And there you have it. You can now use your mouse and keyboard across both your computers. And, if you have enough desktop space for even more monitors, you can continue to add devices to Barrier until your room ends up looking something like this:
If you use Barrier to clean up your workspace, make sure to share a ‘before’ and ‘after’ photo with us on Twitter.
The post Share your keyboard and mouse between computers with Barrier appeared first on Raspberry Pi.
from Raspberry Pi Blog – Raspberry Pi https://ift.tt/3bO4DpC


No comments:
Post a Comment
Please do not enter any spam link in the comment box.