Along with yesterday’s launch of the new 8GB Raspberry Pi 4, we launched a beta 64-bit ARM version of Debian with the Raspberry Pi Desktop, so you could use all those extra gigabytes. We also updated the 32-bit version of Raspberry Pi OS (the new name for Raspbian), so here’s a quick run-through of what has changed.
NEW Raspberry Pi OS update (May 2020)
An update to the Raspberry Pi Desktop for all our operating system images is also out today, and we’ll have more on that in tomorrow’s blog post. For now, fi…
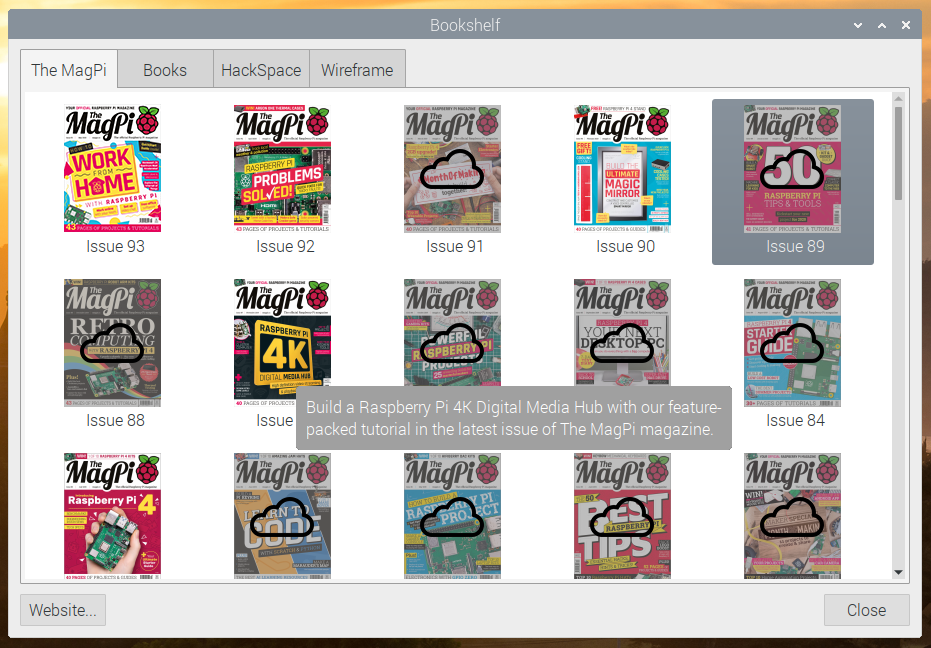
Bookshelf
As many of you know, we have our own publishing company, Raspberry Pi Press, who publish a variety of magazines each month, including The MagPi, HackSpace magazine, and Wireframe. They also publish a wide range of other books and magazines, which are released either to purchase as a physical product (from their website) or as free PDF downloads.
To make all this content more visible and easy to access, we’ve added a new Bookshelf application – you’ll find it in the Help section of the main menu.

Bookshelf shows the entire current catalogue of free magazines – The MagPi, HackSpace magazine and Wireframe, all with a complete set of back issues – and also all the free books from Raspberry Pi Press. When you run the application, it automatically updates the catalogue and shows any new titles which have been released since you last ran it with a little “new” flash in the corner of the cover.
To read any title, just double-click on it – if it is already on your Raspberry Pi, it will open in Chromium (which, it turns out, is quite a good PDF viewer); if it isn’t, it will download and then open automatically when the download completes. You can see at a glance which titles are downloaded and which are not by the “cloud” icon on the cover of any file which has not been downloaded.
All the PDF files you download are saved in the “Bookshelf” directory in your home directory, so you can also access the files directly from there.
There’s a lot of excellent content produced by Raspberry Pi Press – we hope this makes it easier to find and read.
Magnifier
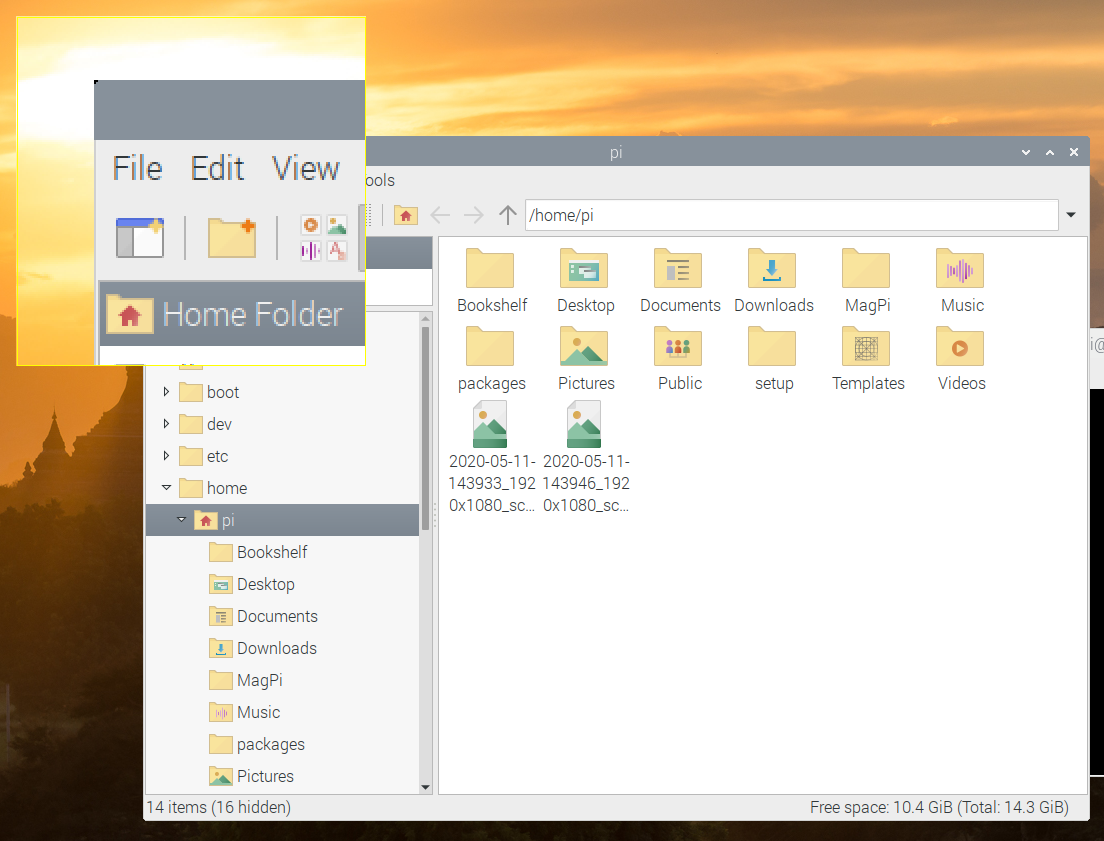
As mentioned in my last blog post (here), one of the areas we are currently trying to improve is accessibility to the Desktop for people with visual impairments. We’ve already added the Orca screen reader (which has had a few bug fixes since the last release which should make it work more reliably in this image), and the second recommendation we had from AbilityNet was to add a screen magnifier.
This proved to be harder than it should have been! I tried a lot of the existing screen magnifier programs that were available for Debian desktops, but none of them really worked that well; I couldn’t find one that worked the way the magnifiers in the likes of MacOS and Ubuntu did, so I ended up writing one (almost) from scratch.
To install it, launch Recommended Applications in the new image and select Magnifier under Universal Access. Once it has installed, reboot.
You’ll see a magnifying glass icon at the right-hand end of the taskbar – to enable the magnifier, click this icon, or use the keyboard shortcut Ctrl-Alt-M. (To turn the magnifier off, just click the icon again or use the same keyboard shortcut.)

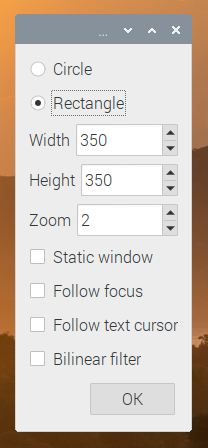
Right-clicking the magnifier icon brings up the magnifier options. You can choose a circular or rectangular window of whatever size you want, and choose by how much you want to zoom the image. The magnifier window can either follow the mouse pointer, or be a static window on the screen. (To move the static window, just drag it with the mouse.)

Also, in some applications, you can have the magnifier automatically follow the text cursor, or the button focus. Unfortunately, this depends on the application supporting the required accessibility toolkit, which not all applications do, but it works reasonably well in most included applications. One notable exception is Chromium, which is adding accessibility toolkit support in a future release; for now, if you want a web browser which supports the accessibility features, we recommend Firefox, which can be installed by entering the following into a terminal window:
sudo apt install firefox-esr
(Please note that we do not recommend using Firefox on Raspberry Pi OS unless you need accessibility features, as, unlike Chromium, it is not able to use the Raspberry Pi’s hardware to accelerate video playback.)
I don’t have a visual impairment, but I find the magnifier pretty useful in general for looking at the finer details of icons and the like, so I recommend installing it and having a go yourself.
User research
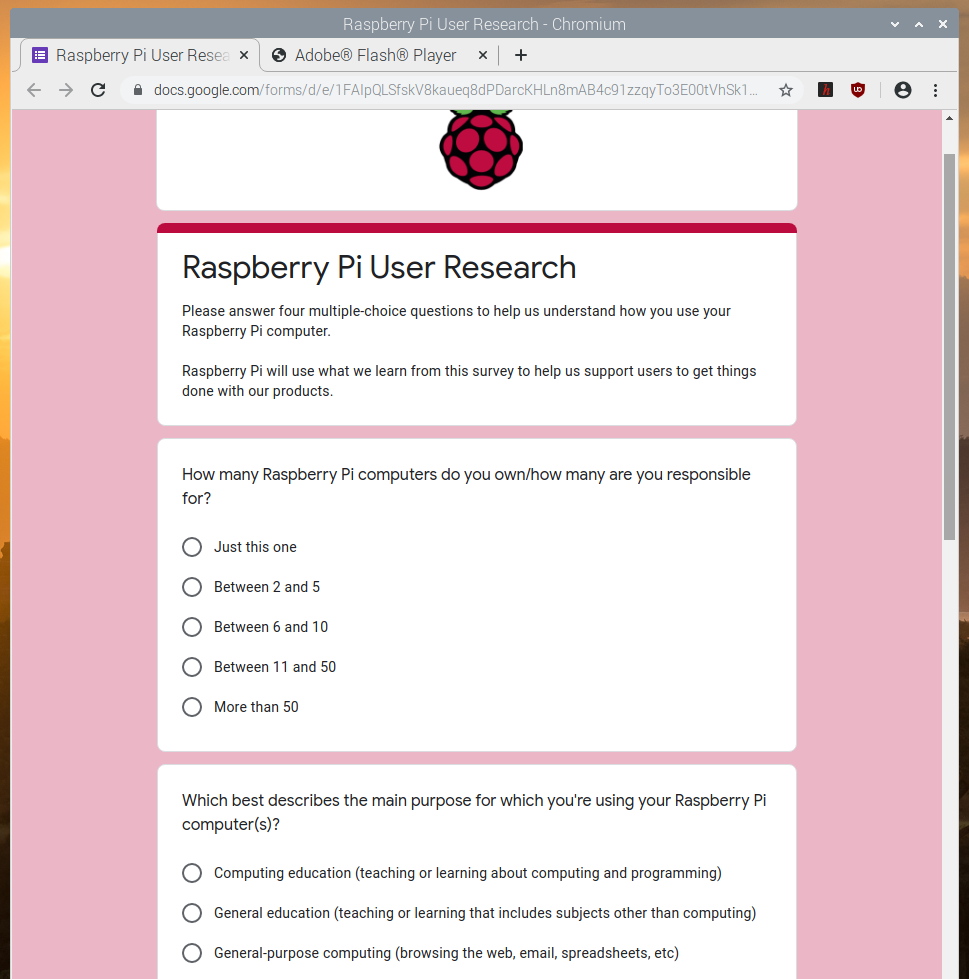
We already know a lot of the things that people are using Raspberry Pi for, but we’ve recently been wondering if we’re missing anything… So we’re now including a short optional questionnaire to ask you, the users, for feedback on what you are doing with your Raspberry Pi in order to make sure we are providing the right support for what people are actually doing.
This questionnaire will automatically be shown the first time you launch the Chromium browser on a new image. There are only four questions, so it won’t take long to complete, and the results are sent to a Google Form which collates the results.

You’ll notice at the bottom of the questionnaire there is a field which is automatically filled in with a long string of letters and numbers. This is a serial number which is generated from the hardware in your particular Raspberry Pi which means we can filter out multiple responses from the same device (if you install a new image at some point in future, for example). It does not allow us to identify anything about you or your Raspberry Pi, but if you are concerned, you can delete the string before submitting the form.

As above, this questionnaire is entirely optional – if you don’t want to fill it in, just close Chromium and re-open it and you won’t see it again – but it would be very helpful for future product development if we can get this information, so we’d really appreciate it if as many people as possible would fill it in.
Other changes
There is also the usual set of bug fixes and small tweaks included in the image, full details of which can be found in the release notes on the download page.
One particular change which it is worth pointing out is that we have made a small change to audio. Raspberry Pi OS uses what is known as ALSA (Advanced Linux Sound Architecture) to control audio devices. Up until now, both the internal audio outputs on Raspberry Pi – the HDMI socket and the headphone jack – have been treated as a single ALSA device, with a Raspberry Pi-specific command used to choose which is active. Going forward, we are treating each output as a separate ALSA device; this makes managing audio from the two HDMI sockets on Raspberry Pi 4 easier and should be more compatible with third-party software. What this means is that after installing the updated image, you may need to use the audio output selector (right-click the volume icon on the taskbar) to re-select your audio output. (There is a known issue with Sonic Pi, which will only use the HDMI output however the selector is set – we’re looking at getting this fixed in a future release.)
Some people have asked how they can switch the audio output from the command line without using the desktop. To do this, you will need to create a file called .asoundrc in your home directory; ALSA looks for this file to determine which audio device it should use by default. If the file does not exist, ALSA uses “card 0” – which is HDMI – as the output device. If you want to set the headphone jack as the default output, create the .asoundrc file with the following contents:
defaults.pcm.card 1
defaults.ctl.card 1
This tells ALSA that “card 1” – the headphone jack – is the default device. To switch back to the HDMI output, either change the ‘1’s in the file to ‘0’s, or just delete the file.
How do I get it?
The new image is available for download from the usual place: our Downloads page.
To update an existing image, use the usual terminal command:
sudo apt update
sudo apt full-upgrade
To just install the bookshelf app:
sudo apt update
sudo apt install rp-bookshelf
To just install the magnifier, either find it under Universal Access in Recommended Software, or:
sudo apt update
sudo apt install mage
You’ll need to add the magnifier plugin to the taskbar after installing the program itself. Once you’ve installed the program and rebooted, right-click the taskbar and choose Add/Remove Panel Items; click Add, and select the Magnifier option.
We hope you like the changes — as ever, all feedback is welcome, so please leave a comment below!
The post Latest Raspberry Pi OS update – May 2020 appeared first on Raspberry Pi.
from Raspberry Pi https://ift.tt/2ZZzYUr


No comments:
Post a Comment
Please do not enter any spam link in the comment box.