MicroMod Data Logging Carrier Board Hookup Guide a learn.sparkfun.com tutorial
Available online at: http://sfe.io/t1329
Introduction
The MicroMod Data Logging Carrier Board is similar the SparkFun Logomatic to offer users a dedicated data logging board but adds the ability for you to pick a MicroMod Processor Board to customize it for your next data logger project. The Data Logging Carrier board was designed specifically for low power control and sensor data harvesting with the MicroMod ecosystem.
The Data Logging Carrier Board allows you to control power to both the Qwiic connector on the board as well as a dedicated power pin for non-Qwiic peripherals such as serial UART or SPI devices so you can pick and choose when to power the peripherals you are monitoring the data from. It also features a charging circuit for single-cell Lithium-ion batteries along with an RTC battery-backup circuit to maintain power for a real-time clock circuit on your Processor Board.
Required Materials
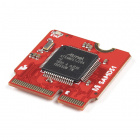
Like all of our MicroMod Carrier Boards, there is no processor included but instead you can plug in a Processor Board of your choice to the MicroMod M.2 connector on the carrier. Below are a few options to choose for your processor:
You'll also need a USB-C cable to connect the Carrier Board to your computer to program your Processor and for serial USB communication. If you want to add some Qwiic breakouts to your MicroMod project you'll want at least one Qwiic cable to connect it all together. Below are some options for both of those cables:
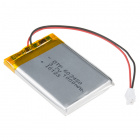
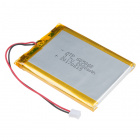
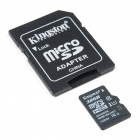
Along with a Processor Board, the pertinent cables and sensors or other items you intend to log the data from, you'll need a microSD card. Lastly, if you would like to have your MicroMod Data Logging project be battery powered, you'll want a single-cell Lithium-ion battery. Below are a few options for both of those accessories:
Suggested Reading
The SparkFun MicroMod ecosystem is designed to allow users to customize their project to their needs. Do you want to send your weather data via a wireless signal (eg. Bluetooth or WiFi)? There's a MicroMod processor for that. Looking to instead maximize efficiency and processing power? You guessed it, there's a MicroMod processor for that. If you are not familiar with the SparkFun MicroMod system, take a look here:
If you aren't familiar with the MicroMod ecosystem, we recommend reading here for an overview:
 |
| MicroMod Ecosystem |
We also recommend reading through the following tutorials if you are not familiar with the concepts covered in them:
Serial Communication
Serial Peripheral Interface (SPI)
SD Cards and Writing Images
Getting Started with MicroMod
Hardware Overview
In this section we'll cover the components on the MicroMod Data Logging Carrier Board, how a specific MicroMod Processor Board interacts with it and highlight a few unique features on the board.
Common Components
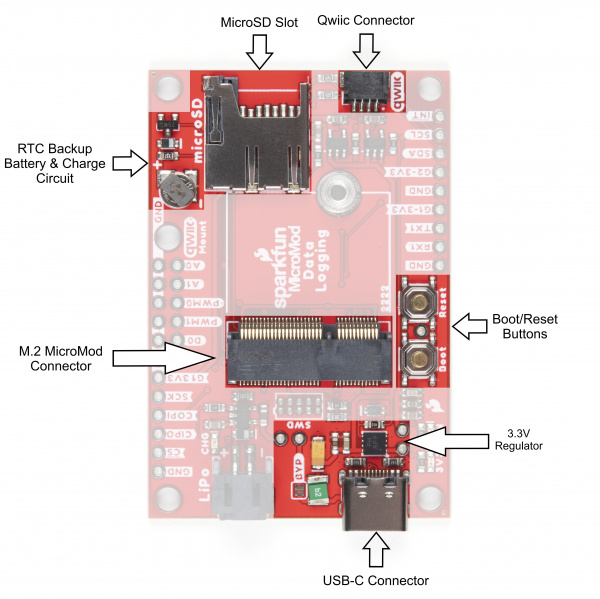
Most SparkFun MicroMod Carrier Boards will have some common components and all MicroMod Carrier Boards will have the keyed M.2 MicroMod Connector to plug your processor into. The photo and list below outline some of the components included on most SparkFun MicroMod Carrier Boards.
- M.2 MicroMod Connector - This special keyed M.2 connector lets you install your MicroMod Processor Board of choice on your Carrier Board.
- USB-C Connector - Connect to your computer to program your Processor Board and also can provide power to your MicroMod system.
- 3.3V Regulator - Provides a regulated 3.3V and sources up to 1A.
- Qwiic Connector - The standard Qwiic connector so you can add Qwiic devices to your MicroMod system.
- Boot/Reset Buttons - Push buttons to enter boot mode on Processor Boards and to reset your MicroMod circuit.
- RTC Backup Battery & Charge Circuit - 1mAh backup battery for the RTC for certain MicroMod Processor Boards . Receives charge voltage from 3.3V.
- microSD Slot - Insert a µSD card formatted to FAT32(?) here to log your data.
Power Control Circuit
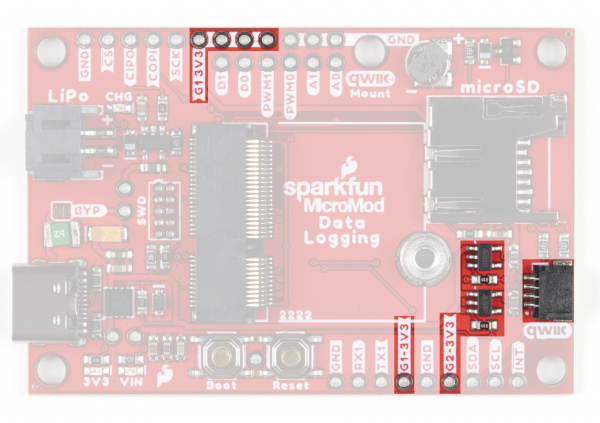
The Data Logging Carrier Board features two 3.3V/600mA voltage regulators that have their Enable pins tied to I/O pins on an attached MicroMod Processor Board. This allows control of the regulators' output with a few lines of code making it extremely simple to control and conserve power in battery-powered applications. The G1-3V3 line is controlled by G1 on the MicroMod Processor and the G2-3.3V circuit is (as you may suspect) is controlled by G2 on the MicroMod Processor. The G1-3.3V power circuit is tied to several pins highlighted in the below photo for extra flexibility powering external devices. The G2-3V3 output is tied to the 3.3V pin on the Qwiic connector as well as a dedicated PTH pin labeled G2-3V3.
Battery Charging Circuit
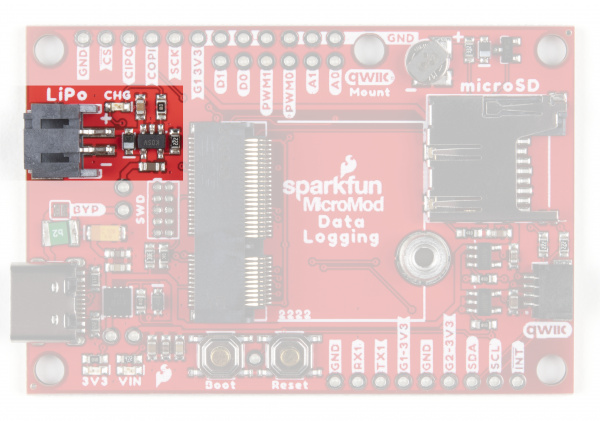
The board also has a MCP73831 Single-Cell Lithium-Ion/Lithium-Polymer Charge IC so you can charge an attached single-cell LiPo battery. The charge IC receives power primarily from USB and can source up to 450mA to charge an attached battery.
Data Logging Connections
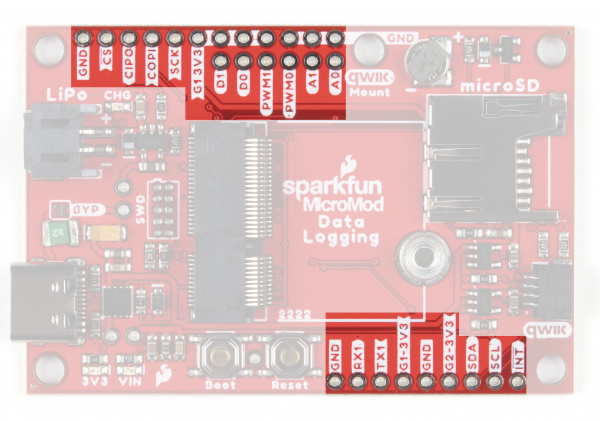
Along with the Qwiic connector mentioned in the Common Components, the Data Logging Carrier Board breaks out several other pins to connect UART, SPI and other I/O devices. The primary SPI pins are netted to the µSD slot and a PTH header near the LiPo battery connector. A second Chip Select pin tied to G0 is broken out to that same header.
A UART PTH header connects to RX1 and TX1 for serial data logging and A0, A1, PWM0, PWM1, D0 and D1 are routed to dedicated PTH pins as well. Lastly, if users prefer a soldered connection instead of Qwiic, the primary I2C bus is broken out to PTH pins.
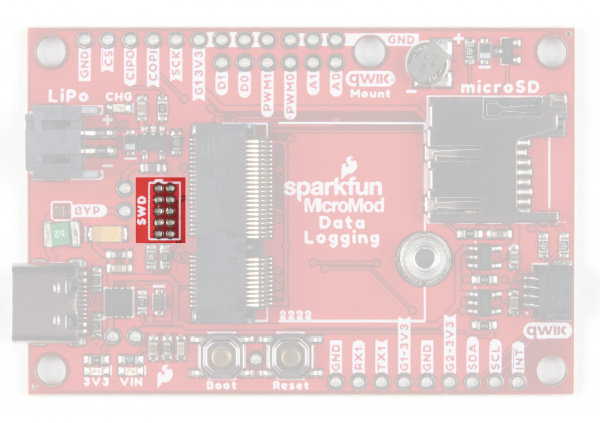
JTAG
An unpopulated JTAG footprint is available for more advanced users who need breakpoint level debugging. We recommend checking out our JTAG section for the compatible male header and a compatible JTAG programmer and debugger.
Solder Jumpers
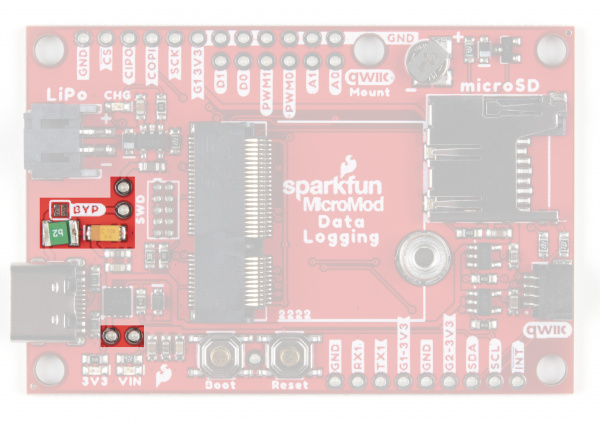
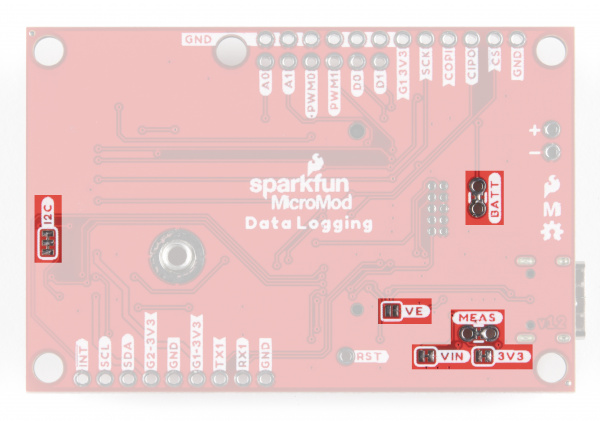
There are seven solder jumpers on the Data Logging Carrier Board labeled I2C, MEAS, BYP, VIN, 3V3, VE, and BATT. In this section we'll detail the functionality and default states of each jumper.
| Jumper Name/Label | Description | Default State |
|---|---|---|
| I2C Pull-Up / I2C | Pulls the Qwiic SDA/SCL lines to 3.3V via two 2.2KΩ resistors | CLOSED |
| Measure / MEAS | Open this jumper to probe the current draw at the 3.3V output of the regulator. For help measuring current, take a look at our How to Use a Multimeter tutorial. | CLOSED |
| Bypass / BYP | The "penny-in-the-fuse" jumper. Bypasses the 6V/2A fuse and nets VIN and V_USB together to allow >2A current flows. Close only if you know what you are doing! | OPEN |
| VIN / VIN_LED | Connects the 5V/VIN LED to 3.7-6V (typ. 5V from USB) via a 4.1KΩ resistor. Open to disable the VIN LED. | CLOSED |
| 3V3 / 3V3_LED | Connects the 3.3V LED to 3.3V via a 1KΩ resistor. Open to disable the 3.3V LED. | CLOSED |
| Voltage Enable / VE | Close this jumper to enable processor control of the 3.3V bus. | OPEN |
| Battery / BATT | Open this jumper to measure current draw from the battery or to switch primary power from USB to battery. | CLOSED |
 |
 |
Board Dimensions
The MicroMod Data Logging Carrier Board measures 2.40" x 1.60" (60.96mm x 40.64mm) and has five mounting holes that fit a 4-40 screw. Take note of the mounting hole labeled "Qwiic Mount" above the µSD slot as it can work as single mount for a Qwiic breakout (or other sensor) or you can pair it with the outer mount in the "top-right" corner for a more secure mounting option. We demonstrate using these two mounts for a Qwiic breakout in the following section, Hardware Assembly.
Now that we're familiar with the hardware on the MicroMod Data Logging Carrier Board, it's time to plug your Processor Board and peripheral sensors in and start logging some data. Next up we'll cover some assembly tips.
Hardware Assembly
Inserting the Processor Board
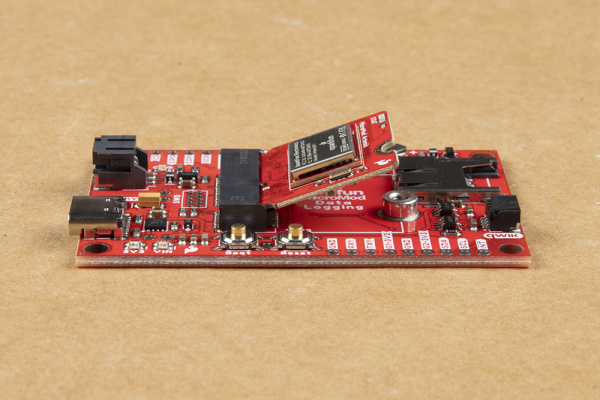
With the M.2 MicroMod connector, connecting your processor board is easy. Match up the key on your processor's beveled edge connector to the key on the M.2 connector on your Carrier Board. At a 45° angle, insert the processor board to the M.2 connector. The Processor Board will stick up at an angle as seen here:
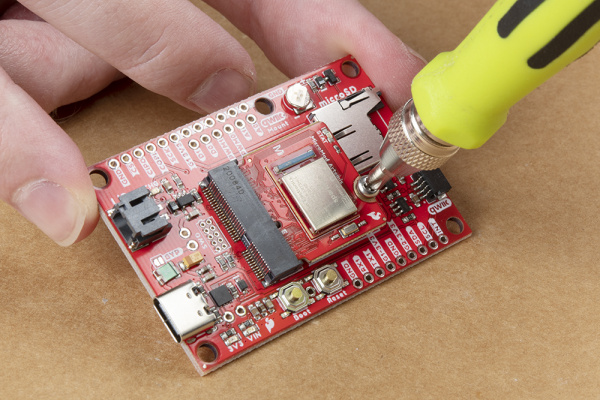
Once the board is in the socket, gently press the Processor Board down, grab the set screw and tighten it with a Phillip's head screwdriver:
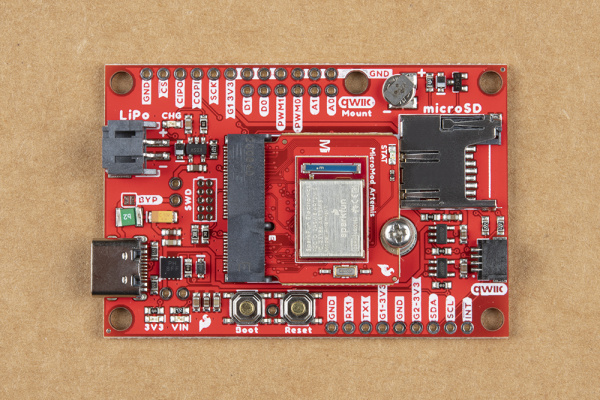
Once the Processor Board is secure, your assembled MicroMod system should look similar to the image below!
Data Logging Peripherals
As we mentioned previously, the Data Logging Carrier Board offers several ways to connect your sensors or other peripherals you intend to log data from.
If you are using a Qwiic breakout just connect it using a Qwiic cable to the Qwiic connector on the Carrier Board. If your I2C device is not Qwiic-enabled, you can either use a Qwiic adapter cable or connect the peripheral to the Carrier Board using the 0.1"-spaced PTH pins for I2C. Soldering is strongly recommended for this approach but if you just want a temporary connection for prototyping you can use IC Hooks like these or these.
For alternate data inputs using SPI, Serial UART or other inputs (analog, digital, etc.), you will need to connect them to the 0.1"-spaced PTH pins broken out on either side of the Data Logging Carrier Board using one of the methods covered above. Take note of which 3.3V rail you are connecting them to for easy reference when controlling power to your devices after everything is soldered together.
Before powering everything up, insert your microSD card into the card slot and press it in to lock it into place.
Connecting Everything Up
With your processor inserted and secured it's time to connect your MicroMod Data Logging Carrier Board to your computer using the USB-C connector. Depending on which Processor Board you choose and which drivers you already have installed, you may need to install drivers for your processor board. Refer to your Processor Board's Hookup Guide for detailed instructions on how to install them. At this point you can also connect your battery for charging or to power the circuit once USB power is removed.
For this particular tutorial, we are using the Artemis MicroMod Processor Board. Board definitions for this processor board can be found in the Software Setup and Programming section of the Artemis MicroMod Processor Board Hookup Guide.
If you are using a different processor board, go to our MicroMod Processor Boards landing page, find your processor board, and head on over to that tutorial for help installing your board definition.
Arduino Examples
GPS Demo Circuit Example
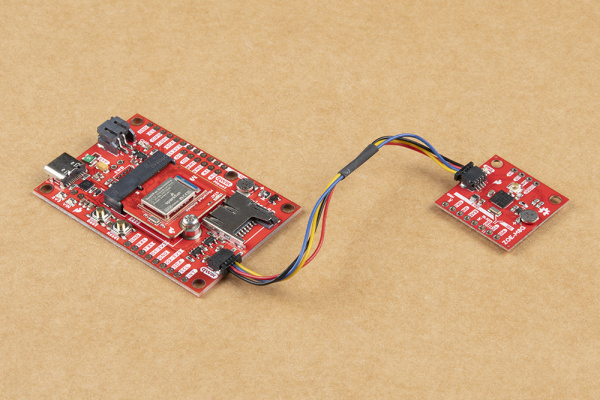
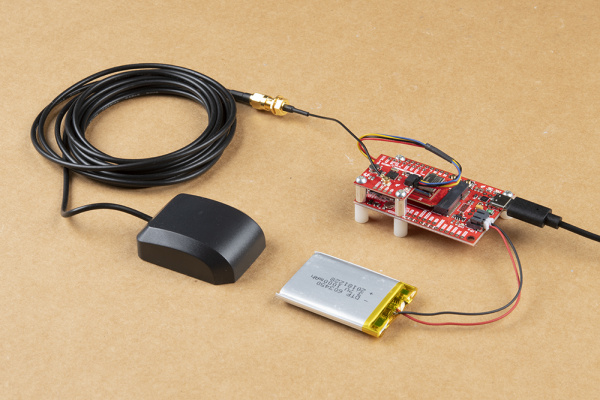
We've written a quick example for the demo circuit from the Hardware Assembly section using the SparkFun GPS Breakout - ZEO-M8Q (Qwiic) to showcase how to log data from the GPS module to a µSD card. To assemble the circuit, simply plug in your GPS module to the Data Logging Carrier Board via a Qwiic cable and attach the GPS Antenna to the board using a u.Fl to SMA Adapter. If you've never worked with u.Fl connectors before this tutorial offers a few quick tips for using them.
In order to run this example you will need to have the SparkFun U-blox Arduino library installed. You can install it with the Arduino Library Manager by searching 'SparkFun Ublox' or you can download the zip here from the GitHub repository:
Copy the code below into a blank Arduino sketch, select your Processor Board (for the demo circuit we select, "SparkFun Artemis MicroMod") and the Port your board has enumerated on. If you are not using the MicroMod Artemis Processor, you'll need to adjust the define for Chip Select:
language:c
/*
  MicroMod Data Logging Carrier Board - ZOE-M8Q GPS Example
  This example code is in the public domain.
*/

#include <SPI.h>
#include <SD.h>
#include <Wire.h>
#include "SparkFun_Ublox_Arduino_Library.h"


#define chipSelect = CS //Primary SPI Chip Select is CS for Artemis MicroMod. Adjust for your processor if necessary.
SFE_UBLOX_GPS myGPS;

long lastTime = 0; //Simple local timer. Limits amount if I2C traffic to Ublox module.
File myFile;

void setup() {
  // Open serial communications and wait for port to open:
  Serial.begin(115200);
  while (!Serial) {
    ; // wait for serial port to connect. Needed for native USB port only
  }
  Wire.begin();
  if (myGPS.begin() == false) //Connect to the Ublox module using Wire port
  {
    Serial.println(F("Ublox GPS not detected at default I2C address. Please check wiring. Freezing."));
    while (1);
  }

  myGPS.setI2COutput(COM_TYPE_UBX); //Set the I2C port to output UBX only (turn off NMEA noise)
  myGPS.saveConfiguration(); //Save the current settings to flash and BBR

  Serial.print("Initializing SD card...");

  // see if the card is present and can be initialized:
  if (!SD.begin(chipSelect)) {
    Serial.println("Card failed, or not present");
    // don't do anything more:
    while (1);
  }
  Serial.println("card initialized.");

  myFile = SD.open("data.txt", FILE_WRITE); // Create or open a file called "data.txt" on the SD card
  if(myFile)
  {
    if(myFile.size() == 0)  // Only create the header if there isn't any data in the file yet
    {
      myFile.println("Date\t\tTime\t\tLatitude\tLongitude\tAlt");
      myFile.println("MM/DD/YYYY\tHH/MM/SS\tdeg\t\tdeg\t\tmm");
      myFile.println("-------------------------------------------------------------------------------------");
    }
    myFile.close(); // Close the file to properly save the data
  }
  else {
    // if the file didn't open, print an error:
    Serial.println("error opening data.txt");
  }

}

void loop()
{
  char gpsDate[10], gpsTime[10];
  //Query module only every 10 seconds. Adjust this value for more/less frequent GPS logs.
  if (millis() - lastTime > 10000)
  {
    lastTime = millis(); //Update the timer
    long latitude = myGPS.getLatitude();
    long longitude = myGPS.getLongitude();
    long altitude = myGPS.getAltitude();
    uint8_t fixType = myGPS.getFixType();
    if(fixType != 0){
      myFile = SD.open("data.txt", FILE_WRITE); // Open file "data.txt"
      if(myFile)
      {
        // Get date and time
      sprintf(gpsDate,"%d/%d/%d", myGPS.getMonth(),myGPS.getDay(),myGPS.getYear());
      if(myGPS.getSecond() < 10){
        sprintf(gpsTime,"%d/%d/0%d", myGPS.getHour(),myGPS.getMinute(),myGPS.getSecond());
      }
      else
      {
        sprintf(gpsTime,"%d/%d/0%d", myGPS.getHour(),myGPS.getMinute(),myGPS.getSecond());
      }
      // Save data to SD card
      myFile.print(gpsDate);
      myFile.print('\t');
      myFile.print(gpsTime);
      myFile.print('\t');
      myFile.print(latitude);
      myFile.print('\t');
      myFile.print(longitude);
      myFile.print('\t');
      myFile.println(altitude);
      }

      Serial.print(gpsDate);
      Serial.print('\t');
      Serial.print(gpsTime);
      Serial.print('\t');
      Serial.print(latitude);
      Serial.print('\t');
      Serial.print(longitude);
      Serial.print('\t');
      Serial.println(altitude);

      myFile.close();

    }
    else  // GPS is looking for satellites, waiting on fix
    {
    uint8_t SIV = myGPS.getSIV();
    Serial.print("Satellites in view: ");
    Serial.println(SIV);
    }
  }
}
With the code adjusted, click the Upload button. For debugging, open your serial monitor and set the baud 115200. The code will print out if the SD card or GPS do not initialize properly. If the SD initialization fails, check that the card is inserted and locked and that it is formatted to FAT32. If the GPS initialization fails, check the connection to your GPS board or verify it is at the default I2C address.
If everything initializes properly, the code will open the "data.txt" file and begin logging data once the GPS has a fix and will also print the same data over serial. If the GPS does not have a lock, the code will print out the number of satellites in view over serial.
Power Control Examples
In addition to this GPS example, we've written two example sketches specifically for the Data Logging Carrier Board demonstrating how to control the 3.3V regulators powering the Qwiic connector/G2-3V3 pin and G1-3V3 rail. They can be found in the MicroMod Data Logging Carrier Board GitHub Repo or you can download the Zip of the repository by clicking the button below
Take note both Qwiic and 3V3 peripheral power are controlled with a P-Channel MOSFET so the logic is reversed (Power ON = LOW and Power OFF = HIGH).
Troubleshooting
If your product is not working as you expected or you need technical assistance or information, head on over to the SparkFun Technical Assistance page for some initial troubleshooting.
If you don't find what you need there, the SparkFun Forums are a great place to find and ask for help. If this is your first visit, you'll need to create a Forum Account to search product forums and post questions.
Resources and Going Further
Hopefully this guide has got you all set to get started with your own MicroMod logging project using the SparkFun MicroMod Data Logging Carrier Board. For more information about the Carrier Board, check out the resources below:
For more information on the MicroMod ecosystem, check out these resources:
Not sure where to start with your own data logging project? The tutorials below may give you some ideas to get the creative juices flowing:
GPS Logger Shield Hookup Guide
Graph Sensor Data with Python and Matplotlib
Spectral Triad (AS7265x) Hookup Guide
Wireless Remote Weather Station with micro:bit
learn.sparkfun.com | CC BY-SA 3.0 | SparkFun Electronics | Niwot, Colorado
from SparkFun Tutorials https://ift.tt/3jgvsXp







No comments:
Post a Comment
Please do not enter any spam link in the comment box.